
Starting an activewear brand? Sourcing from China can be efficient, but skipping key steps during pre-launch sampling can lead to costly mistakes. This guide covers everything you need to know to ensure smooth production and high-quality results, including:
- Choosing between OEM (customized designs) and ODM (pre-designed products) for your manufacturing model.
- Creating a detailed tech pack to avoid miscommunication and costly revisions.
- Requesting Pre-Production Samples (PPS) as a final quality check before mass production.
- Inspecting fabric quality to avoid defects before production starts.
- Negotiating Minimum Order Quantities (MOQs) to fit your budget and growth plans.
- Building a realistic timeline to account for sampling, revisions, and holidays.
- Partnering with manufacturers using advanced equipment and high-quality materials.
- Setting up quality control checkpoints throughout production.
- Testing supplier communication to ensure responsiveness and reliability.
- Conducting factory audits or using sourcing agents to verify supplier legitimacy.

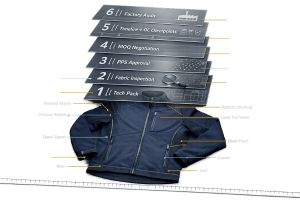
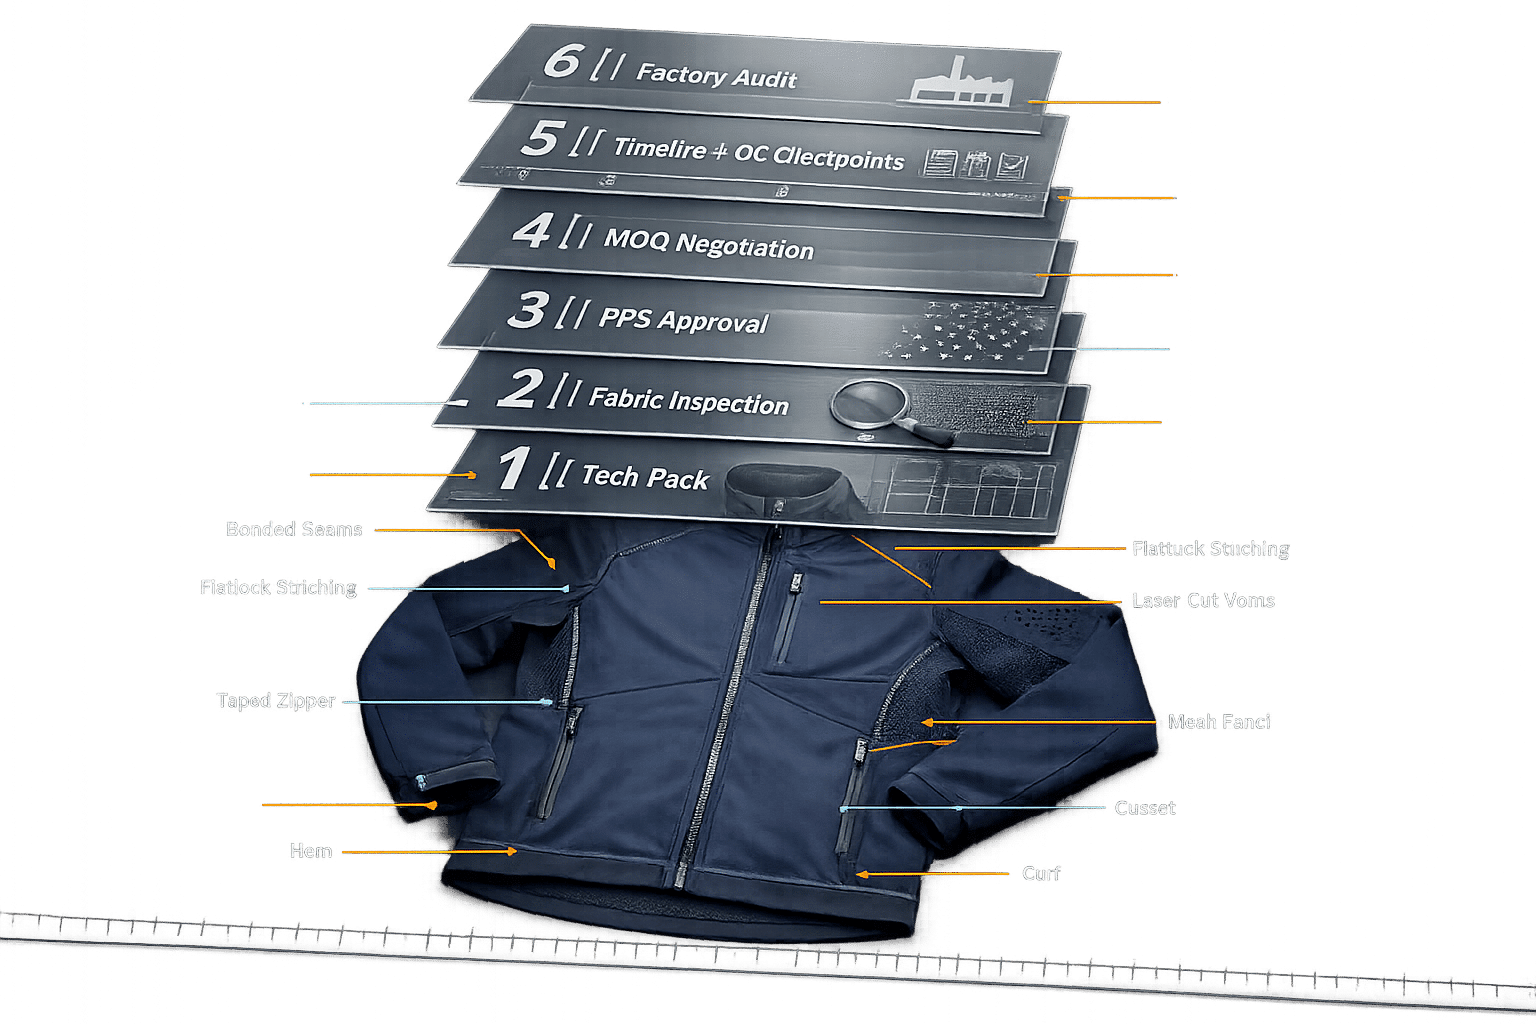
China Sourcing Timeline: From Design to Delivery for Activewear Brands
How Sportswear Factories REALLY Make Your Clothes!
1. Choose Between OEM and ODM Manufacturing Models
Deciding between OEM and ODM manufacturing shapes your product’s uniqueness, production timeline, and budget.
OEM manufacturing allows you to create garments based entirely on your custom specifications. You have control over every detail – fabric composition, compression levels, moisture-wicking treatments, and even specific stitches like the ISO 602 coverstitch, known for its durability. Plus, you retain full ownership of your design and intellectual property. The downside? OEM typically requires more time (12–18 weeks from design to production) and higher minimum order quantities (MOQs), often starting at 500 units per style.
"OEM is where most serious product businesses eventually land… The key advantage is control." – James Kennemer, Founder, Cosmo Sourcing
ODM manufacturing, on the other hand, is faster and more cost-effective upfront. Factories offer pre-designed products that you can tweak with surface-level changes like adding your logo, adjusting brand colors, or updating labels. Production is quicker – 6–10 weeks – and the MOQs are lower, typically between 200 and 400 units. However, the factory retains ownership of the design, which means other brands could sell identical products.
For startups, ODM offers a quicker path to market with less risk, using designs that have already been tested. But if your goal is to create a standout brand with unique features – like proprietary fabric blends or special UPF sun protection – OEM gives you the flexibility to differentiate. For example, in 2025, one startup shifted from ODM to OEM and saw a 38% increase in profit margins on their first fully original collection.
Your choice depends on factors like your timeline, budget, and brand goals. ODM is ideal for speed and lower upfront investment. OEM, however, provides the customization needed for long-term differentiation. Whichever route you take, this decision lays the foundation for everything that follows – from sampling to quality control – and directly impacts your product’s market success. Don’t forget to secure an NNN contract to safeguard your intellectual property. Once you’ve chosen your manufacturing model, the next step is to create detailed technical specifications to ensure your samples meet your performance expectations.
2. Create Detailed Technical Specifications Before Sampling
Think of a tech pack as the blueprint for your garment – it turns your design ideas into something manufacturers can actually produce. Without one, factories are left to guess your requirements, which often leads to expensive mistakes, delays, and samples that don’t meet your expectations.
"The tech pack is akin to an instruction manual or a contract between you and the vendor… there must be no uncertainty on the manufacturer’s behalf." – Cosmosourcing
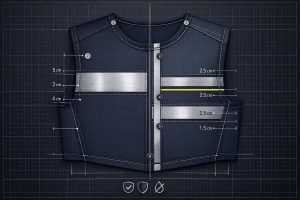
A solid tech pack should cover every detail of your design. Start with technical sketches – flat drawings that show the front, back, and side views of the garment. Add a bill of materials (BOM) listing everything needed, from main fabrics to zippers and labels. Be sure to include a measurement table with precise dimensions for each point of measure (POM) across your size range.
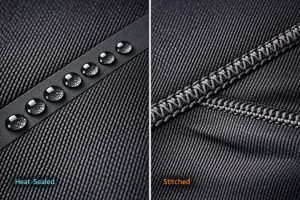
For activewear, go deeper. Specify fabric weight (measured in grams per square meter (GSM)), stretch percentages (e.g., 22% spandex vs. 8%), and any performance features like moisture-wicking or UV protection. A stitch and seam map is also helpful – it outlines the types of stitches (like ISO 301 for lockstitch or ISO 504 for overlock) to ensure durability and proper stretch. Define tolerances, such as ±0.5 cm, so quality control teams know what’s acceptable.
Here’s why this level of detail matters: Brands with thorough tech packs are 82% more likely to reach production after just two rounds of sampling, compared to an average of 4.5 rounds without one. That can save you between $300 and $750 per design during the sampling phase.
Don’t forget to provide all artwork in vector formats (like .ai, .pdf, or .psd) with exact Pantone codes and clear placement instructions. This ensures accurate printing or embroidery without distortion. Also, include wash test requirements for shrinkage and colorfastness. When revisions are needed, consolidate feedback into a single document with annotated photos to make corrections crystal clear.
Most Chinese factories charge between $50 and $150 per sample and usually allow 2–3 free revisions before adding extra fees. Basic samples typically take 7–10 days to produce, while fully custom designs may require 15–30 days. A detailed tech pack keeps everything on track, reduces the number of prototype rounds, and speeds up your time to market. With this in hand, you’re ready to move forward with confidence to quality checks and sampling reviews.
3. Request Pre-Production Samples (PPS) for Quality Review
Once your tech pack and initial prototypes are finalized, it’s time to request a Pre-Production Sample (PPS) – your last quality checkpoint before moving into mass production. This sample is created using the exact bulk fabric, trims, hardware, and labels that will be part of your final order. Think of it as the "golden standard" that all future units will be measured against.
"PPS approval is your green light to start mass production. It’s the last chance to spot major defects, test for compliance, and ensure all contracted requirements are met." – Ninghow
Carefully compare the PPS against your tech pack, paying close attention to every specification. Check critical details like stitch density at high-stress areas such as the crotch and underarms – especially for activewear, which needs reinforced seams to withstand movement and frequent washing. Test functional components like zippers, drawcords, and elastic bands to ensure they operate smoothly even after repeated use. Verify that the fabric weight (GSM), hand feel, and opacity match your approved swatch. Also, confirm color accuracy by comparing the sample to your Pantone standards under consistent lighting conditions.
Don’t skip a wash test. Running the sample through a home laundry cycle can reveal issues like shrinkage, color bleeding, or cracking in prints. Additionally, check that all branding elements – logos, embroidery, care labels, and country-of-origin tags – align with your specifications and meet U.S. legal requirements.
The cost for a PPS typically ranges from $50 to $300, and it usually takes about 10 to 15 days to produce. Many factories include one or two revision rounds in the sampling process, but extra rounds may come with additional fees. To streamline the process, compile all your feedback into a single, well-organized document with annotated photos. Use clear language when providing feedback, such as "Approved", "Approved with Comments", "Revise and Resubmit", or "Rejected."
Avoid rushing to approve a flawed PPS due to tight deadlines. Catching and addressing issues at this stage can save you from expensive mistakes across your entire production run. Once you’ve approved the PPS in writing, keep it as your master reference for evaluating the final bulk delivery. This step helps protect the 50–70% of your garment cost tied up in fabric and materials.
Working with experienced manufacturers, like New Dong Huang Garment Co., Ltd. (https://test1.techsolutionn.com), can simplify the pre-production sampling process. They ensure strict quality control and adherence to your design and performance requirements, helping you avoid unnecessary setbacks. Up next, inspect fabrics before production to guarantee alignment with your quality expectations.
4. Inspect Fabrics Before Production Begins
Once your PPS (Pre-Production Sample) gets the green light, the next step is all about checking the bulk fabric before cutting starts. This step is critical because fabric costs typically make up 50% to 70% of a garment’s total expense. Catching defects or inconsistencies now can save you from costly mistakes later – imagine the headache of discovering issues after the fabric has already been cut. This inspection also ensures that the bulk order matches your approved PPS, setting the tone for the rest of the production process.
Start by visually inspecting the fabric rolls. Look for defects like stains, holes, snags, tears, and color streaks. Double-check that the fabric’s color matches your approved Pantone standards using shade bands – variations beyond a Delta E of 1.5 can lead to garments with mismatched tones. Also, confirm the fabric’s weight and width align with your specifications. For instance, receiving 180gsm fabric when you ordered 220gsm is a major red flag.
"If the clothing material is subpar, everything else will fall apart." – WorldFirst
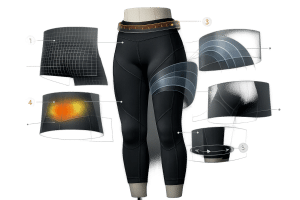
Don’t overlook performance testing. Wash fabric swatches to check for shrinkage (it should be under 3%), pilling resistance, and colorfastness. Stretch the fabric both horizontally and vertically to ensure it bounces back without losing shape. For activewear, test for moisture-wicking and breathability to confirm they perform as promised. Also, check the grainline direction – it should run vertically on body panels and horizontally on sleeves to avoid twisting or stretching issues.
Next, compare the fabric’s handfeel and texture to your golden sample. Whether it’s softness, stiffness, or slickness, the bulk fabric should match your expectations. If a fabric that’s supposed to be a natural fiber blend feels unexpectedly synthetic, that’s a clear sign of a quality problem. For added assurance, consider hiring a third-party inspection service to run lab tests on shrinkage (AATCC 135/150), pilling resistance (ISO 12945), and colorfastness (ISO 105-C06) before moving forward.
Manufacturers like New Dong Huang Garment Co., Ltd. prioritize fabric inspections as part of their quality control processes, ensuring materials meet your standards before cutting begins. This step ties into the larger quality assurance framework, which includes everything from tech pack accuracy to sample testing. Once you’re confident in the fabric’s integrity, you can move on to MOQ (Minimum Order Quantity) negotiations.
5. Understand and Negotiate Minimum Order Quantities (MOQs)
Once you’ve inspected fabric quality, the next crucial step is negotiating Minimum Order Quantities (MOQs). MOQs represent the smallest number of units a factory will produce in a single run. For activewear, these typically fall between 500 and 3,000 units per style or color, depending on the level of customization involved. These minimums aren’t random – they stem from factors like fabric mill requirements (often around 500 meters per color), machinery setup costs, and the need for factories to maintain efficiency and profitability.
For startups, high MOQs can be a financial hurdle. Imagine having $15,000 in seed funding but facing a 2,000-unit MOQ – unsold inventory could quickly become a liability. To work around this, consider using stock fabrics that the factory already has, which eliminates the need for custom dyeing and lowers your MOQ. Another strategy is to combine variants, such as ordering multiple colors or sizes under a single style, or even offering a price premium (often 10–15% more per unit) to cover the factory’s setup costs for smaller production runs.
Take Lena Ruiz, for example. In 2021, the founder of Portland-based Thread & Grain faced a 2,000-unit MOQ for custom knit fabric – way beyond her $15,000 budget. She negotiated with a mill in Guimarães, Portugal, agreeing to use their existing GOTS-certified organic cotton yarn and paying a 12% price premium. This brought her MOQ down to just 300 units. Within 18 months, she expanded to 12 SKUs and eventually achieved a 40% reduction in blended MOQs.
"Low MOQ isn’t about squeezing suppliers – it’s about designing supply chains where small volumes generate mutual value. The best partners don’t see your 200 units as ‘not enough.’ They see them as the first 200 of a thousand." – Rajiv Mehta, Founder, SupplyChain Collective
Certain manufacturers, like New Dong Huang Garment Co., Ltd., cater to startups with flexible MOQs, recognizing that a 200-unit order today could grow into a 2,000-unit order tomorrow. Be open about your growth plans and sales channels – factories are more likely to accommodate smaller orders when they see potential for a long-term partnership. Finally, make sure your production timeline accounts for sampling, revisions, and any potential shipping delays.
sbb-itb-8dbc09a
6. Build a Realistic Timeline for Sampling and Production
Once you’ve determined MOQs, it’s time to map out a timeline that covers every step from sampling to shipment. Typically, the entire process – from concept to delivery – takes around 12 to 20 weeks. Basic sampling alone usually requires 10 to 21 days, but if you’re working with custom fabrics or intricate designs, this can stretch to 15 to 60 days.
One of the biggest culprits for delays? Material sourcing and approvals. For example, custom-dyed fabrics might tack on an extra 2 to 3 weeks, while jacquard or embroidered performance fabrics can take 20 to 30 days. Incomplete tech packs or unclear feedback can also lead to additional rounds of revisions.
"Delayed fabric sourcing or dyeing can push lead times back by 2–3 weeks, especially when sourcing rare, sustainable, or custom-developed materials." – Elaine Zhou, Business Director at Shanghai Garment
General Timeline Breakdown
| Stage | Duration |
|---|---|
| Design confirmation | 3–7 days |
| Fabric & trim sourcing | 10–15 days |
| Sample & approval | 5–10 days |
| Bulk production | 20–35 days |
| Final inspection & packing | 5–8 days |
| Export prep & documentation | 2–5 days |
To keep things running smoothly, aim to set your internal delivery date at least 15 days ahead of your actual launch. This buffer can help absorb any unexpected delays. Opting for in-stock fabrics rather than custom-dyed ones is another way to save time. Additionally, consolidating feedback with clear photos and annotations can reduce back-and-forth communication. Use milestone calendars to track key dates, like when fabrics arrive and sewing begins.
Don’t forget to account for major Chinese holidays, such as Chinese New Year and National Day Golden Week, which can disrupt production for 10 to 20 days. Transparent communication with your suppliers and shared production trackers can significantly lower the risk of delays – by as much as 60%.
Careful timeline management is the cornerstone of a successful pre-launch strategy and sets the stage for the quality control processes we’ll discuss next.
7. Work with Manufacturers Using Advanced Equipment and Materials
After ensuring rigorous pre-production sampling and fabric inspections, the next step is collaborating with manufacturers that use advanced equipment and high-quality materials. The tools and materials a factory uses play a significant role in matching bulk production quality to pre-launch samples. For instance, computer-controlled cutting tables can process up to 5,000 pieces daily – making them 2.5 times faster than manual cutting – while maintaining precision in stitch placement and seam allowances. This combination of speed and accuracy is essential for producing consistent bulk orders.
For activewear, flatlock stitching machines are indispensable. They create smooth, durable seams that enhance both comfort and mobility. Factories with in-house testing labs equipped with tools like tensile and abrasion testers can verify fabric performance before production even begins. Additionally, automated quality checks during production help catch errors in real time, reducing the risk of defects in mass-produced items.
Material selection is equally important. Performance fabrics such as Nylon/Spandex and Polyester/Spandex blends deliver the stretch and moisture-wicking properties that activewear requires. For brands looking to align with consumer preferences for sustainability, options like recycled polyester, bamboo fiber, and organic cotton are excellent choices. These materials also meet certifications like GOTS and OEKO-TEX, which are increasingly valued by eco-conscious customers. Given that fabric costs typically account for 50–70% of total production expenses, making informed material choices is critical.
Take New Dong Huang Garment Co., Ltd. as an example of a manufacturer that meets these standards. With over 27 years of experience in activewear production, they utilize advanced equipment such as bonding machines and laser cutting systems. Their material innovations include eco-friendly, quick-dry, anti-odor, and anti-UV fabrics, all supported by global certifications like BSCI, Sedex, and GRS. This combination of expertise and technology ensures precision and consistency, turning approved samples into high-quality bulk orders.
When assessing manufacturers, ask for detailed equipment inventories and review maintenance logs during factory tours to confirm their quality control practices. Ensure they can provide certifications for the materials they use and rely on digital design tools like Clo3D or Adobe Illustrator to streamline the sampling process. These technologies minimize physical sample iterations, speeding up the journey from concept to production without compromising quality. By choosing manufacturers with cutting-edge machinery and specialized stitching capabilities, you establish a strong foundation for scalable, high-quality production.
8. Set Up Quality Control Checkpoints Throughout Production
Quality control isn’t just a final step – it needs to be part of every stage of production. A solid system includes three layers of inspection: incoming material checks, in-line production reviews, and final quality audits.
"A garment QC system is a set of checks that happen at the right time, not just at the end." – Ninghow
Start with an incoming material inspection before cutting. Examine fabric rolls for defects like stains, holes, or tears. Confirm color consistency against approved lab dips (flagging deviations beyond a Delta E of 1.5), and check physical properties such as GSM weight and handfeel. Catching these issues early ensures your materials meet quality expectations and prevents costly mistakes later.
Next, conduct in-line checks during sewing. Focus on stitch density, seam strength, and measurement tolerances (typically within ±0.5 cm of tech pack specifications). Many reputable factories inspect 20–30% of products at this stage and aim for defect rates as low as 0.5–1%.
Finally, perform a final quality audit using Acceptable Quality Limits (AQL): 2.5 for major defects and 4.0 for minor defects in sportswear. This step involves random sampling to verify details like labeling, accessory durability, and packaging compliance. For packaging, check folding, barcode readability, polybag thickness, and carton markings. For critical launches, hiring third-party inspectors for unbiased audits can add an extra layer of assurance.
To streamline these efforts, establish a "golden sample" – your approved pre-production sample – as the benchmark for all inspections. Clearly define tolerances in your tech pack and require photos or videos at key production stages, such as cutting, sewing, and printing. This reduces subjectivity and allows you to monitor progress remotely. Keep detailed defect logs with fabric roll codes for traceability in case issues arise after delivery.
Brands that consistently use pre-production samples and enforce quality checkpoints report 60% fewer production issues in bulk runs. By embedding these practices into your workflow, you can maintain high-quality standards throughout the production process.
9. Test Supplier Communication and Response Times
Clear and effective communication can make all the difference in your sampling process. In fact, communication gaps are often the main reason things go wrong during sample development. Before committing to a factory, take time to assess how they handle feedback, resolve issues, and keep you updated.
Start by paying attention to their initial response times. A reliable factory should provide a quote within 3–5 days. If it takes over a week – or you need to send multiple reminders to get a response – that’s a warning sign about how they might handle future deadlines.
"Until you’ve gone through the sampling process and seen how a supplier communicates, responds to feedback, and produces your specific product, you don’t really know who you’re dealing with"
Make sure the factory thoroughly reviews your tech pack. They should flag missing measurements or unclear details before moving forward with the next sample. Skipping this step often leads to samples that don’t meet expectations.
Throughout the sampling process, insist on regular updates, like weekly photos or videos, to catch potential issues early. This level of transparency helps you avoid expensive delays. Factories that use real-time messaging tools like WhatsApp or WeChat are often better equipped for smooth international communication.
To streamline feedback, consolidate all notes into a single numbered document with annotated photos. Assign one point of contact for decisions on fit and design. Think of this phase as a trial run to see if the supplier can meet your technical standards and match your brand’s communication style. By evaluating these factors now, you’ll set yourself up for smoother production later.
10. Use Sourcing Agents or Conduct Factory Audits
Before diving into production, it’s crucial to confirm that your supplier is both legitimate and capable of meeting your needs. Poor supplier selection is a common pitfall, with nearly 43% of importers experiencing major disruptions because of it. Taking the time to vet suppliers – whether through sourcing agents or factory audits – can save you from costly mistakes. This process usually takes 4–6 weeks and requires around 50–80 hours of effort.
Sourcing agents play a key role in this process. They handle tasks like verifying business licenses, inspecting facilities, and ensuring you’re working directly with a factory rather than a middleman. These agents also help bridge communication gaps, especially when language or cultural differences could complicate negotiations. Their fees typically range from 5–10% of the order value or a flat rate of $500–$1,000 per project. Alternatively, professional factory audits or third-party inspections cost between $100 and $300 per man-day. By working with verified suppliers, you set the stage for smoother production and ensure that quality standards established during sampling are upheld.
If you decide to handle the auditing yourself, a three-tier verification approach can be effective. Start by checking public documents, like business licenses, on China’s State Administration for Market Regulation website (gsxt.gov.cn). Next, request a 15-minute live video walkthrough of the production floor to get a real-time view of operations. Finally, reach out to the factory’s past clients for references. This method not only complements earlier quality checks but also ensures the factory’s operational integrity matches your expectations. During on-site visits, pay attention to details like machinery condition, quality control systems, and overall operational standards. Red flags include idle production floors during peak hours or hesitancy to show key production areas.
"Reliable factories welcome scrutiny, as evidenced by their transparent systems." – Li Wei, Senior Sourcing Director, LeapGlobal Procurement Advisors
Take AuraVita’s experience as a cautionary tale. In 2021, the company lost $18,000 after choosing a Dongguan factory based solely on its online profile. A later three-hour audit helped them identify a certified partner, which led to a four-year partnership and 92% of their product line being sourced from that verified facility.
Conclusion
Getting pre-launch sampling right with Chinese manufacturers boils down to three key factors: detailed planning, effective communication, and strict quality control. A comprehensive tech pack removes ambiguity, helping to avoid the misunderstandings that often delay sampling. Your Pre-Production Sample (PPS) becomes the gold standard for production, locking in the exact fabrics, trims, and craftsmanship before bulk production begins. Skipping this critical step can lead to costly setbacks.
Each stage of the sampling process acts as a safeguard for your production workflow. From prototypes to fit samples, and finally to the PPS, these checkpoints establish clear production standards. Providing precise feedback – complete with numbered comments and annotated photos – is essential. Vague instructions only lead to confusion and expensive revisions. For activewear brands, early testing of fabrics for stretch recovery, moisture-wicking, and colorfastness ensures performance expectations are met before committing to large-scale orders.
"The difference between a smooth first order and a $25,000 loss on defective inventory often comes down to diligence applied before the purchase order is issued – not after."
- Lena Moore, Author
Setting these quality benchmarks also helps build strong, long-term relationships with suppliers. When factories see consistent communication and clear growth potential, they’re often more open to flexible pricing and lower minimum order quantities. While prototype samples typically cost $50–$200, PPS samples range from $80–$300 – an investment that protects you from much larger financial losses.
FAQs
How do I choose OEM vs. ODM for my first activewear launch?
Choosing between OEM (Original Equipment Manufacturer) and ODM (Original Design Manufacturer) comes down to what you’re aiming for, how much you’re willing to invest, and how quickly you need results.
- OEM gives you complete control over creating unique products. This is perfect if you want something that stands out in the market. However, it comes with higher costs, longer production timelines, and requires expertise in design and development.
- ODM, on the other hand, is all about speed and cost-efficiency. By working with pre-existing designs, you can get your product to market faster and at a lower cost. This makes it a great option if you’re focused on quick launches or working within a tighter budget.
If standing out with a custom product is your priority, go for OEM. But if you need to move fast and keep costs down, ODM is the way to go.
What should I test on a pre-production sample before approving bulk?
Before giving the green light to a pre-production sample, it’s crucial to examine a few critical elements to ensure everything aligns with your quality and design expectations:
- Materials, trims, and colors: Double-check that these match the original specifications.
- Measurements and tolerances: Verify the fit and dimensions are accurate and within acceptable limits.
- Construction methods: Ensure the techniques used meet your quality benchmarks.
- Overall quality: Pay attention to details like fabric texture, stitching, and finishing touches.
- Artwork placement: If applicable, confirm that logos, prints, or designs are positioned correctly.
Careful evaluation at this stage ensures the sample accurately reflects the final product, helping you avoid setbacks or quality concerns during mass production.
How can I lower MOQs without risking quality or delays?
To reduce MOQs while maintaining quality and avoiding delays, partner with manufacturers skilled in small batch production. Begin with straightforward designs and use the same fabric for several products to meet fabric minimums and cut costs. Prioritize clear communication, provide detailed tech packs, and negotiate flexible terms to uphold quality and minimize production mishaps.